
Published:
Quick Answer
To use the Ameda GLO, clean and disinfect the milk-contact parts before your first session, assemble each collection cup, and select the flange or Soft Flange Insert that fits comfortably. Center your nipple in the flange, place the pump upright inside a supportive bra, and press and hold the power button. GLO begins in Stimulation Mode and automatically moves to Expression Mode after two minutes unless you choose another mode. Start with gentle suction and increase it only to a level that remains comfortable.
Getting started with a new wearable pump can feel like a lot, but once you know how the parts fit together, GLO is designed to make hands-free pumping feel simple. The Ameda GLO® combines four pumping modes, adjustable hospital-grade suction, rechargeable portability, and lightweight collection cups that fit inside your bra.
Whether you are pumping occasionally or exclusively pumping, a secure assembly and correct fit can help every session run more smoothly. This guide walks you through preparing, fitting, operating, charging, and cleaning your GLO so it can deliver reliable performance within your pumping routine.
Key Takeaways
- Boil the milk-contact parts for 10 minutes before first use.
- Use the 24 mm flange alone or add the Soft Flange Insert that fits comfortably.
- Center your nipple carefully to create a complete seal and help prevent rubbing.
- Choose from Stimulation, Expression, Massage, and Automatic modes.
- Each pumping mode offers 15 adjustable suction levels.
- GLO remembers the last suction level used.
- A full charge takes approximately two hours and provides up to 100 minutes of operation.
- Each pump weighs 8.6 ounces, and each collection cup holds up to 6 ounces.
- Clean every milk-contact part after each session and keep the pump motor dry.

Get to Know Your Ameda GLO
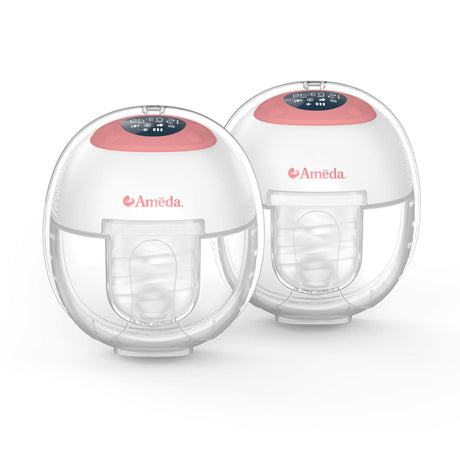
- Two wearable pump motors
- Two 24 mm flanges
- Two collection cups
- Two silicone diaphragms
- Four valves
- Two USB-C charging cables
- Two bra adjustment straps
- Two each of the 17 mm, 19 mm, and 21 mm Soft Flange Inserts
Additional Soft Flange Inserts are available in sizes from 11 mm through 21 mm, and a 27 mm flange is available separately. Each breast can use a different size, so customize the fit on each side if needed.
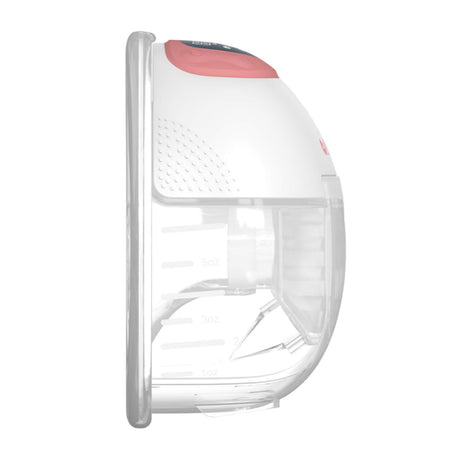
At 8.6 ounces per pump, GLO is lightweight and portable enough to support greater freedom throughout the day. Each reusable collection cup has a 6-ounce capacity for efficient milk collection.
Before every session, wash your hands and inspect the flanges, inserts, diaphragms, valves, cups, and motors for cracks, tears, discoloration, or wear. Do not use a damaged part.
Step 1: Clean the Parts Before First Use
GLO milk-contact parts are supplied non-sterile, so all parts that come into contact with breast milk need to be cleaned and disinfected before the first pumping session.
Separate the following parts from each motor:
- Flange
- Soft Flange Insert, if used
- Silicone diaphragm
- Valve
- Collection cup
Place the milk-contact parts in enough boiling water to cover them completely and boil for 10 minutes. Remove the pieces carefully and allow them to air-dry completely on a clean, unused dish towel or paper towel before reassembly.
Never boil, wash, or immerse the pump motor. Because the motor contains the electronics that power your pump, it should be kept dry. If cleaning is needed, wipe the outside with a clean, damp cloth.
Step 2: Assemble the Collection Cups
Clean, dry parts and a complete seal are the foundation of a good pumping session. To assemble each side:
- Insert the valve into the collection cup in the correct orientation.
- Place the silicone diaphragm inside the cup and press around the edges to form a secure seal.
- Align the flange groove with the groove on the collection cup.
- Press firmly around the flange until it fits tightly against the cup.
- Insert the Soft Flange Inserts into the flange when using them.
- Align the notch beneath the pump motor with the top of the diaphragm.
- Push the motor onto the assembled collection cup until it sits securely.
Before placing the pump in your bra, run a finger around each connection to check that the valve, diaphragm, and flange are fully seated. A loose or misaligned part can lead to leaking or reduced suction.
Step 3: Find a Comfortable Flange Fit
The correct fit can make pumping more comfortable and efficient while helping maintain a reliable seal. The standard GLO package includes 24 mm flanges and Soft Flange Inserts in 17 mm, 19 mm, and 21 mm sizes. Smaller inserts and a 27 mm flange are available separately.
Center your nipple in the flange tunnel before turning on the pump.
During pumping:
- Your nipple should move freely without rubbing against the tunnel.
- The flange should form a complete seal against your breast.
- Only a small amount of breast tissue should be drawn into the tunnel.
- Pumping should not pinch, rub, or hurt.
Flange size can differ from one breast to the other, and fit may change during your pumping journey. If a previously comfortable setup begins to cause rubbing, pinching, leaking, or reduced suction, check the fit again. A qualified lactation professional can also help assess flange size.
Step 4: Position GLO Inside Your Bra
Press the flange against your breast with your nipple centered in the tunnel. Place the assembled pump upright inside a supportive, well-fitting bra. The bra should hold the collection cup securely against your breast without creating painful pressure.
Need a little more room? Attach one of the included bra adjustment straps to lengthen the bra straps and create a more comfortable fit.
GLO supports hands-free pumping, but it is still important to keep each pump upright. Excessive tilting or high-impact movement may affect suction or lead to leaking, especially as the collection cups fill. Before moving around, make sure the cups feel secure and there are no gaps between the flange and your breast.
Step 5: Turn On the Pump and Choose a Mode
Press and hold the power/pause button to turn on each pump. GLO begins in Stimulation Mode and automatically changes to Expression Mode after two minutes unless you manually choose another mode.
GLO offers four pumping modes:
- Stimulation Mode: Uses soft, rhythmic suction that mimics early nursing patterns to help encourage letdown.
- Expression Mode: Provides customizable suction to support milk removal once milk begins flowing.
- Massage Mode: Uses a gentle suction pattern designed to support comfort and help get milk moving.
- Automatic Mode: Moves through a preset cycle that adjusts suction and speed to help you find a comfortable setting.
Use the mode button to move between modes. Each mode offers 15 adjustable suction levels, giving you room to find the pattern and strength that work best for you.
Step 6: Adjust the Suction for Comfort
Start at a low suction level and increase it gradually with the plus button. The best setting is the highest level that still feels comfortable — not simply the highest level available.
Stronger suction does not always mean more milk. If you notice pinching, pulling, or pain, lower the suction and recheck the flange position and size. Comfort and a complete seal matter more than turning the suction all the way up.
Use the power/pause button for a quick pause without ending the session. GLO also remembers the last suction level used, which can make it easier to return to a familiar setting the next time you pump. The pump will still begin in Stimulation Mode when it is turned on.
Step 7: Finish the Pumping Session
When the session is complete, press and hold the power/pause button to turn off each motor. Slip a finger between your breast and the flange to release the seal gently before removing the pump.
Keep the cup upright as you separate the motor. Pour the expressed milk through the cup opening into a clean storage bottle or breast milk storage bag. Each reusable collection cup holds up to 6 ounces, so stop pumping before the milk reaches the maximum fill line and avoid tilting a full cup.
GLO automatically shuts off after 30 minutes. That feature is a back-up rather than a required session length. Pumping time and frequency can vary, so follow your individual feeding plan or ask a healthcare provider or lactation professional for personalized guidance.

How to Charge the Ameda GLO
Connect the included USB-C cable to the charging port and use a certified 5VDC, 1-amp adapter. Do not use a fast-charging or high-output power block, as it may damage the pump motor.
A full charge takes approximately 120 minutes and provides up to 100 minutes of pumping time. GLO does not operate while charging, so disconnect the USB-C cable before beginning a session.
The easiest routine is to recharge the motors between pumping sessions rather than waiting for the battery to run out. That way, your pumps are ready when you need them.
After Every Session: Clean the Milk-Contact Parts
Cleaning your pump parts soon after each session helps keep milk from drying in small spaces and makes the next cleanup easier.
Fully disassemble and wash the:
- Flange
- Soft Flange Insert
- Silicone diaphragm
- Valve
- Collection cup
Wash each part with mild dishwashing soap and warm soapy water, then rinse thoroughly. The milk-contact parts can also be placed on the dishwasher's top rack. Place valves and other small pieces in a closed-top basket or mesh bag so they do not become lost or damaged.
Handle valves carefully and never insert a brush or other object into them. After washing, place every part on a clean, unused dish towel or paper towel and allow it to air-dry completely. Avoid rubbing or patting parts dry, and never store them while damp.
Keep the motor and display dry. Wipe the outside with a clean, damp cloth only when needed.
Check Your Parts for Wear
Even with careful cleaning, reusable pump parts wear over time. Before each session, check for:
- Cracks or chips in the flange or collection cup
- Tears, thinning, or discoloration in silicone parts
- Valves that appear stretched or no longer hold their shape
- Parts that do not connect securely
- Leaking or reduced suction after confirming correct assembly
Replace worn or damaged parts before the next pumping session. Keeping a spare set of valves, diaphragms, and flanges nearby can help prevent an unexpected pause in your routine.
You've Got This, Mom
Using a new wearable pump takes a little practice, but the routine soon becomes familiar: clean parts, secure assembly, the right flange fit, and a comfortable suction level.
With four customizable modes, 15 suction levels, quiet operation, and a rechargeable hands-free design, GLO is made to help pumping fit more easily into a busy day. It may also be available through insurance at little or no out-of-pocket cost, depending on your health plan. Learn more about insurance coverage, or explore Ameda's pump parts to keep your routine running smoothly.
Always refer to the GLO Instructions for Use for complete assembly, operating, charging, cleaning, and safety instructions.
Frequently Asked Questions
Which flange sizes come with the Ameda GLO?
The standard package includes 24 mm flanges and Soft Flange Inserts in 17 mm, 19 mm, and 21 mm sizes. Additional insert sizes and a 27 mm flange are available separately.
Which GLO mode should you use first?
GLO automatically begins in Stimulation Mode to help encourage letdown. It changes to Expression Mode after two minutes, or you can manually choose another mode.
How many suction levels does GLO have?
Each of the four modes—Stimulation, Expression, Massage, and Automatic—offers 15 adjustable suction levels.
Can GLO be worn under clothing?
Yes. GLO is designed to sit inside a supportive bra for hands-free pumping. Keep the cups upright and make sure the bra holds them securely without creating uncomfortable pressure.
Can GLO operate while charging?
No. Disconnect the USB-C charging cable before turning on the pump.
Are GLO collection cups dishwasher safe?
Yes. The collection cups and other milk-contact parts can be cleaned on the dishwasher's top rack. Place small components in a closed-top basket or mesh bag, and allow every part to air-dry completely before reassembly or storage.
DISCLAIMER: This guide supplements rather than replaces the Instructions for Use provided with the pump. Always follow Ameda's complete assembly, operating, charging, cleaning, milk-storage, and safety instructions.