
Published:
Quick Answer
To use the Ameda Mya Joy PLUS, clean and sanitize all milk-contact parts before the first pumping session, assemble the HygieniKit® Milk Collection System, connect the tubing, and center the correct flange over your breast. Turn on the pump in Stimulation Mode, start with low suction, and gradually increase it to the highest level that still feels comfortable. The pump automatically switches to Expression Mode after two minutes, or you can change modes sooner when milk begins to flow.
Learning to use a new breast pump can feel like a lot at first, but a simple setup routine makes all the difference. The Mya Joy PLUS combines hospital-strength performance with a compact motor designed to fit comfortably in the palm of your hand. Its quiet operation, two modes, adjustable suction, and rechargeable battery make it suitable for daily pumping at home, at work, or on the go.
This step-by-step guide explains how to use the Ameda Mya Joy PLUS, from preparing and assembling the pump to choosing an ideal flange fit, adjusting the two modes, and cleaning the milk-contact parts.
Key Takeaways
- Clean and sanitize all parts that contact your breast or milk before first use.
- Choose a flange size that lets your nipple move freely without rubbing or pinching.
- Begin with low suction and increase it only to a strong but comfortable level.
- Use Stimulation Mode to help start milk flow and Expression Mode once milk begins flowing.
- Keep pumping sessions consistent when possible to support milk supply and make the routine easier to maintain.
- Wash milk-contact parts after every pumping session and allow them to air-dry completely.
- Do not routinely wash the adapter caps, tubing, or tubing adapter.
- Inspect the valves, diaphragms, tubing, flanges, bottles, and other components before each use.
Get to Know Your Mya Joy PLUS
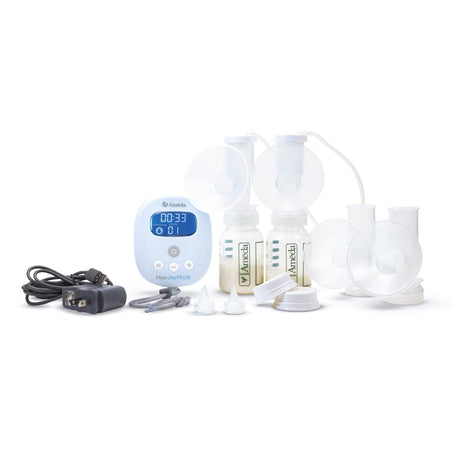
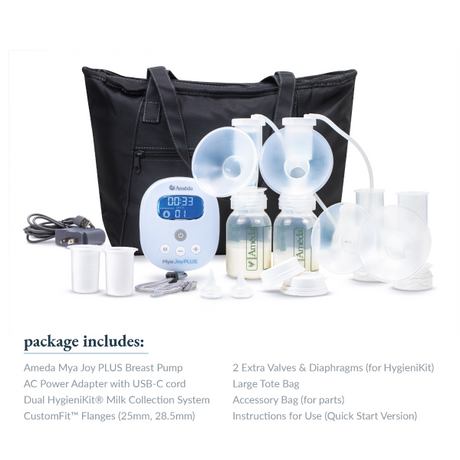
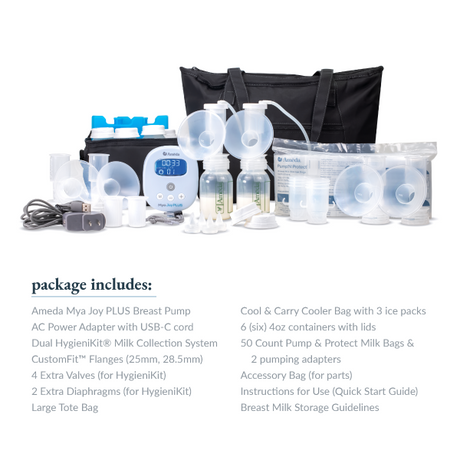
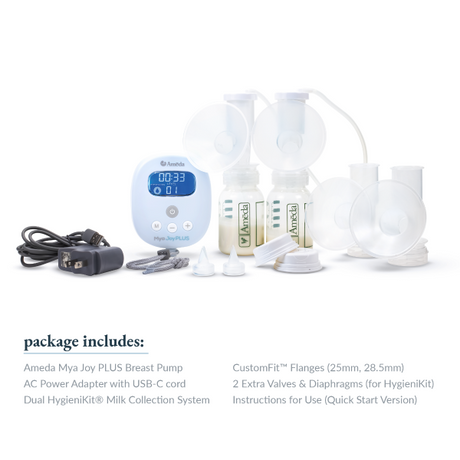
Before you begin, take a moment to get familiar with the parts in your pump kit. The Mya Joy PLUS base package includes:
- Ameda Mya Joy PLUS pump unit
- AC power adapter with USB-C cord
- Dual HygieniKit Milk Collection System
- 25 mm and 28.5 mm CustomFit™ flanges
- Two extra valves and diaphragms
- Quick-start Instructions for Use
The Ameda Mya Joy PLUS uses the closed-system HygieniKit Milk Collection System with a silicone diaphragm. The diaphragm helps keep the air from the pump and tubing separate from the parts exposed to breast milk, helping prevent milk from backing up into the tubing.
Before every pumping session, wash your hands and inspect the HygieniKit system to help ensure proper function and hygiene. Check the pump, power adapter, tubing, and collection-kit parts for cracks, chips, tears, wear, or exposed wires. Do not use a damaged component. Contact Ameda ParentCare or the supplier that provided your pump for help with replacement parts.
Before First Use: Clean and Sanitize the HygieniKit
Even though your pump kit is new, the milk-contact parts need to be cleaned and sanitized before the first pumping session.
- Flanges
- Diaphragms
- Valves
- Bottles
- Bottle-locking rings and discs
Follow the sanitizing directions in the Mya Joy PLUS Instructions for Use. The milk-contact parts may be sanitized by boiling or by using a microwave steam bag according to the bag manufacturer's instructions. Allow every component to air-dry completely on a clean surface before assembly.
Set aside the adapter caps, tubing, and tubing adapter. These parts do not come into direct contact with milk and do not need to be washed before first use or after every session.
The good news? Once the first-use preparation is complete, a consistent cleaning routine helps keep the process simple.
Step 1: Charge or Connect the Pump
Insert the small end of the included power adapter into the USB-C connection on the side of the pump before plugging the adapter into the wall outlet. A full charge from 0% takes at least 2.5 hours. The rechargeable battery is designed to support portable pumping, and the pump can also operate while connected to the recommended Ameda power adapter.
The battery indicator on the display shows the approximate remaining charge. Charging the pump before you plan to rely on battery power can help prevent an interrupted session.
Only use the AC power adapter recommended for the Mya Joy PLUS. Always inspect the adapter and cord for damage before use.
Step 2: Assemble the HygieniKit Milk Collection System
Once all cleaned parts are completely dry, wash your hands and assemble the collection kit:
- Hold each valve by the rim or thicker sides and push it onto the bottom of the flange.
- Insert a completely dry diaphragm into the top of each flange. A dry diaphragm helps prevent moisture from forming in the tubing.
- Attach and tighten a collection bottle onto each flange.
- Press the adapter cap onto the top of each flange until you hear a pop.
- Insert the tubing adapter into the right side of the pump and gently push it in to make sure the connection is secure.
For double pumping, keep both tubes connected to the tubing adapter. Double pumping expresses milk from both breasts at the same time, which can make a pumping session more time-efficient and may support overall milk removal. For single pumping, remove one tube and close that side of the adapter with the attached plug.
Step 3: Check Your Flange Fit
Proper flange size supports comfort and effective milk expression, so it is worth checking your fit before every session. The base package includes 25 mm and 28.5 mm CustomFit™ flanges, and additional sizes are available.
Center your nipple in the flange tunnel so it can move freely during pumping. A centered nipple can help create a secure seal and avoid rubbing or discomfort.
During pumping:
- Your nipple should move without rubbing against the sides of the tunnel.
- Only a small amount of breast tissue should be pulled into the tunnel.
- The flange should maintain a secure seal.
- Pumping should not pinch, rub, or hurt.
If pumping is uncomfortable or the flange does not seal well, a different size may be needed. Flange fit can also change over time, so recheck it if a previously comfortable setup begins to feel different. A lactation professional can help if you are unsure which size is right for you.
Step 4: Begin in Stimulation Mode
Center the flange on your breast and create a comfortable seal. Press the power button to turn on the pump. The Mya Joy PLUS automatically begins in Stimulation Mode, which uses fast, light cycles to mimic a baby's initial sucking pattern and encourage milk letdown.
Stimulation Mode has six suction levels. Begin at a low setting, then press the plus button to increase suction gradually. The ideal setting is the highest level that remains comfortable — not simply the highest setting available.
Higher suction does not always lead to increased milk production or more milk during a session. If you feel pain, pinching, or irritation, lower the suction and check your flange position and fit.
Step 5: Switch to Expression Mode
The Mya Joy PLUS automatically switches to Expression Mode after two minutes. You can also press the mode button to switch sooner once milk begins to flow.
Expression Mode uses slower, deeper pulls to support efficient milk removal and offers 12 suction levels. Adjust the level until milk is flowing and pumping still feels comfortable. Your preferred setting may change from one session to the next, and that is completely normal.
If milk flow slows during the session, try returning to Stimulation Mode briefly before switching back to Expression Mode. A calm setting, a consistent pumping routine, and gentle breast massage may also help support letdown.
Step 6: Finish Your Pumping Session
When you are ready to finish, press the power button before removing the flanges. If the seal feels strong, gently place a finger between your breast and the flange to release the suction, then remove the flange from your breast.
The pump automatically shuts off after 45 minutes. That feature is a back-up, not a required session length. Pumping time should be based on your comfort, milk flow, and individual feeding or pumping plan.
Remove the bottles from the collection kit, close them with clean lids, and store your milk promptly according to current breast milk storage guidance. Never microwave breast milk or thaw it in boiling water, as uneven heating can create hot spots and cause burns.

[IMAGE: Ameda Mya Joy Plus breast pump with dual breast shields and tubing arranged on a white tray.]
After Every Session: Clean the Milk-Contact Parts
Cleaning your pump parts as soon as possible after each session helps prevent milk residue from drying in small spaces and keeps the kit ready for next time.
After every use:
- Fully disassemble the flange, valve, diaphragm, bottle, locking ring, and locking disc.
- Wash each milk-contact part according to the Mya Joy PLUS Instructions for Use.
- Rinse thoroughly.
- Place the parts on a clean, unused dish towel or paper towel and allow them to air-dry completely.
- Store the dry parts in a clean, protected area until the next session.
Do not place the pump motor in water or a sterilizer. If needed, wipe the pump exterior with a clean, damp cloth.
What About Tubing?
The adapter caps, tubing, and tubing adapter do not need routine washing because milk should not come into contact with them.
Take a quick look at the tubing before each session:
- If the tubing is dry and clean: No washing is needed.
- If condensation is present: Rinse the tubing with cool water, wash it in warm soapy water, rinse thoroughly, and hang it to air-dry completely before use. The tubing may also be replaced.
- If milk enters the tubing or tubing connector: Do not attempt to wash, clean, or sterilize it. Contact Ameda ParentCare for guidance.
Keeping the diaphragm completely dry during assembly can help prevent condensation from forming in the tubing.

Keep an Eye on Wear and Tear
Even with careful cleaning, pump parts can wear over time. Before each session, check for:
- Cracks or chips in plastic parts
- Tears, stretching, or thinning in valves and diaphragms
- Tubing damage or moisture
- Bottles or flanges that are warped or no longer connect securely
- Reduced suction that continues after checking the assembly
Worn or damaged components can affect suction and pump performance. Inspect the silicone valves and diaphragms before each use, and replace them with compatible Ameda parts if they show tears, stretching, thinning, or other damage. Keeping a spare set of frequently used parts nearby can make replacements much less disruptive.
Ready to Pump, Mom?
The first few sessions with a new pump may take a little extra time, but the routine soon becomes familiar: clean parts, a secure assembly, a comfortable flange fit, and suction that feels strong without hurting.
With its compact size, quiet operation, adjustable settings, and rechargeable design, the Mya Joy PLUS is made to bring more flexibility to everyday pumping. Explore additional pump parts and accessories, learn how to get a breast pump through insurance, or visit Ameda's breastfeeding resources for more support along the way.
Always refer to the instructions for use for the complete operating, cleaning, safety, milk-storage, and troubleshooting guidance for your pump.
Frequently Asked Questions
When should you switch from Stimulation Mode to Expression Mode?
Switch when milk begins to flow. The Mya Joy PLUS automatically changes to Expression Mode after two minutes, but you can press the mode button to switch earlier.
What suction level should you use?
Begin at a low level and gradually increase the suction until it feels strong but comfortable. The best setting is the highest level that remains comfortable. Lower the suction and check your flange fit if pumping hurts.
Can the Mya Joy PLUS be used for single pumping?
Yes. Remove one tube from the tubing adapter and close that side with the attached plug.
Does the pump tubing need to be washed?
Not during routine cleaning. If condensation appears, follow Ameda's instructions to wash and completely air-dry the tubing or replace it. If milk enters the tubing or tubing connector, do not attempt to clean or sterilize it; contact Ameda ParentCare.
What should you do if pumping hurts?
Turn off the pump, gently break the flange seal with a finger, and remove the flange. Check the suction setting, flange position, and flange size before trying again. Stop using the pump and contact a healthcare provider or lactation professional if pain or irritation continues.
How long does the Mya Joy PLUS battery last?
The Mya Joy PLUS has an integrated rechargeable battery that provides up to three hours of pumping time during normal operation. Actual run time may vary with use and settings. Charge the pump fully before relying on battery power away from an outlet.
At Ameda, we design our breast pumps, accessories, and educational resources to support comfortable and effective milk expression at every stage of your breastfeeding journey.
DISCLAIMER: This guide supplements rather than replaces the Instructions for Use supplied with the pump. Always follow the manufacturer's complete operating, cleaning, safety, and milk-storage instructions. Contact Ameda ParentCare, a healthcare provider, or a qualified lactation professional with questions or concerns.